日期:2019-5-21 21:05:15
地点:家中
前言
最近也是闲来无事,加上对swagger-bootstrap-ui也已经发布了将近26个稳定版本了,想到很多以后更有趣的功能,从Java底层扩展插件的方式开发出让国人拥有更棒的文档体验,所以决定研究一下springfox的源码,看能否对自己有一些启发.开发一些有趣的功能呢.
关于springfox的使用这里不做过多的说明,可以自行搜索查看帮助文档,或者可以参考我提供的swagger-bootstrap-ui-demo进行swagger的集成示例.
在读springfox的源码之前,我们需要知道他具体的作用是什么?
我觉得有以下几点:
- 对Spring的RestController、Controller接口进行包装,封装输出为Swagger规范中的path
- 针对Rest接口涉及到的model进行解析,包括model的属性等
- 满足文档分组的要求,解析tags
总结一句话就是:输出符合Swagger API规范的JSON格式
Swagger 规范
OpenAPI 2.0 规范可以参考官网地址:https://swagger.io/specification/v2/
先来看我们的Swagger规范文件包含哪些元素
{
    "swagger": "2.0",
    "info": {
        "description": "<div style='font-size:14px;color:red;'>swagger-bootstrap-ui-demo RESTful APIs</div>",
        "version": "1.0",
        "title": "swagger-bootstrap-ui很棒~~~!!!",
        "termsOfService": "http://www.group.com/",
        "contact": {
            "name": "group@qq.com"
        }
    },
    "host": "127.0.0.1:8999",
    "basePath": "/",
    "tags": [
        {
            "name": "1.8.2版本",
            "description": "Api 182 Controller"
        }
    ],
    "paths": {
        "/2/api/new187/postRequest": {
            "post": {
                "tags": [
                    "api-1871-controller"
                ],
                "summary": "版本2-post请求参数Hidden属性是否生效",
                "operationId": "postRequestUsingPOST_1",
                "consumes": [
                    "application/json"
                ],
                "produces": [
                    "*/*"
                ],
                "parameters": [
                    {
                        "in": "body",
                        "name": "model187",
                        "description": "model187",
                        "required": true,
                        "schema": {
                            "originalRef": "Model187",
                            "$ref": "#/definitions/Model187"
                        }
                    }
                ],
                "responses": {
                    "200": {
                        "description": "OK",
                        "schema": {
                            "originalRef": "Rest«Model187»",
                            "$ref": "#/definitions/Rest«Model187»"
                        }
                    },
                    "201": {
                        "description": "Created"
                    },
                    "401": {
                        "description": "Unauthorized"
                    },
                    "403": {
                        "description": "Forbidden"
                    },
                    "404": {
                        "description": "Not Found"
                    }
                },
                "security": [
                    {
                        "BearerToken": [
                            "global"
                        ]
                    },
                    {
                        "BearerToken1": [
                            "global"
                        ]
                    }
                ],
                "deprecated": false
            }
        }
    },
    "securityDefinitions": {
        "BearerToken": {
            "type": "apiKey",
            "name": "Authorization",
            "in": "header"
        }
    },
    "definitions": {
        "AInfoVo": {
            "type": "object",
            "required": [
                "aId",
                "bList"
            ],
            "properties": {
                "aId": {
                    "type": "string",
                    "description": "A记录主键"
                },
                "bList": {
                    "type": "object",
                    "description": "B信息Map, key为BInfoVo的主键pkId",
                    "additionalProperties": {
                        "originalRef": "BInfoVo",
                        "$ref": "#/definitions/BInfoVo"
                    }
                }
            },
            "title": "AInfoVo",
            "description": "A信息"
        },
        "ActInteger": {
            "type": "object",
            "properties": {
                "doub1": {
                    "type": "number",
                    "format": "double",
                    "description": "double类型属性"
                },
                "float1": {
                    "type": "number",
                    "format": "float",
                    "description": "float类型属性"
                },
                "name": {
                    "type": "string"
                },
                "number": {
                    "type": "integer",
                    "format": "int64",
                    "description": "Long类型"
                },
                "price": {
                    "type": "number",
                    "description": "BigDecimal类型属性"
                },
                "sort": {
                    "type": "integer",
                    "format": "int32",
                    "description": "int类型"
                }
            },
            "title": "ActInteger"
        },
        "Actor": {
            "type": "object",
            "properties": {
                "address": {
                    "type": "string"
                },
                "deepOne": {
                    "originalRef": "DeepOne",
                    "$ref": "#/definitions/DeepOne"
                },
                "recipt": {
                    "originalRef": "Recipt",
                    "$ref": "#/definitions/Recipt"
                },
                "sort": {
                    "type": "integer",
                    "format": "int32"
                }
            },
            "title": "Actor"
        }
    }
}
一个标准的Swagger接口规范可能类似上面的JSON文件,主要有以下属性:
- swagger:当前swagger的版本号
- info:文档的基础信息,包括描述信息,标题、作者、host等
- tags:分组tag标志
- paths:接口明细集合
- securityDefinitions:权限信息
- definitions:接口涉及到的Model类型定义
使用
我们对Swagger的规范定义有了一个初步的了解,所以,接下来,我们来查看springfox是如何来实现的
我们在使用springfox-swagger的时候主要有两步:
- 创建
Docket实例对象,并使用@Bean注解注入到Spring容器中 - 在Swagger的配置类上添加
@EnableSwagger2注解
开始
我们从springfox的使用文档上来看,也仅仅知道告诉我们开发人员,需要从@EnableSwagger2这个注解入手,来跟踪springfox的创建流程
但是我在看了该注解后,发现其实并不是这样,springfox源码中使用了大量的Spring的@Component注解进行实体bean的注入,所以要想找到各个类的依赖关系可以说是相当复杂,加上使用了Spring项目中并不怎么流行的spring-plugin组件,这更加增加了的阅读源码的难度,说实话,看过之后,已经留下了眼泪(这乱七八糟的什么玩意儿:( )…..
@EnableSwagger2
先来看EnableSwagger2注解的代码
package springfox.documentation.swagger2.annotations;

import org.springframework.context.annotation.Import;
import springfox.documentation.swagger2.configuration.Swagger2DocumentationConfiguration;

import java.lang.annotation.Documented;
import java.lang.annotation.Retention;
import java.lang.annotation.Target;

/**
 * 配合Java配置注解@Configuration使用,启用Swagger的配置注解,使用@Import注解导入Swagger文档的Configuration配置初始化类
 * @see springfox.documentation.spring.web.plugins.Docket
 */
@Retention(value = java.lang.annotation.RetentionPolicy.RUNTIME)
@Target(value = { java.lang.annotation.ElementType.TYPE })
@Documented
@Import({Swagger2DocumentationConfiguration.class})
public @interface EnableSwagger2 {
}
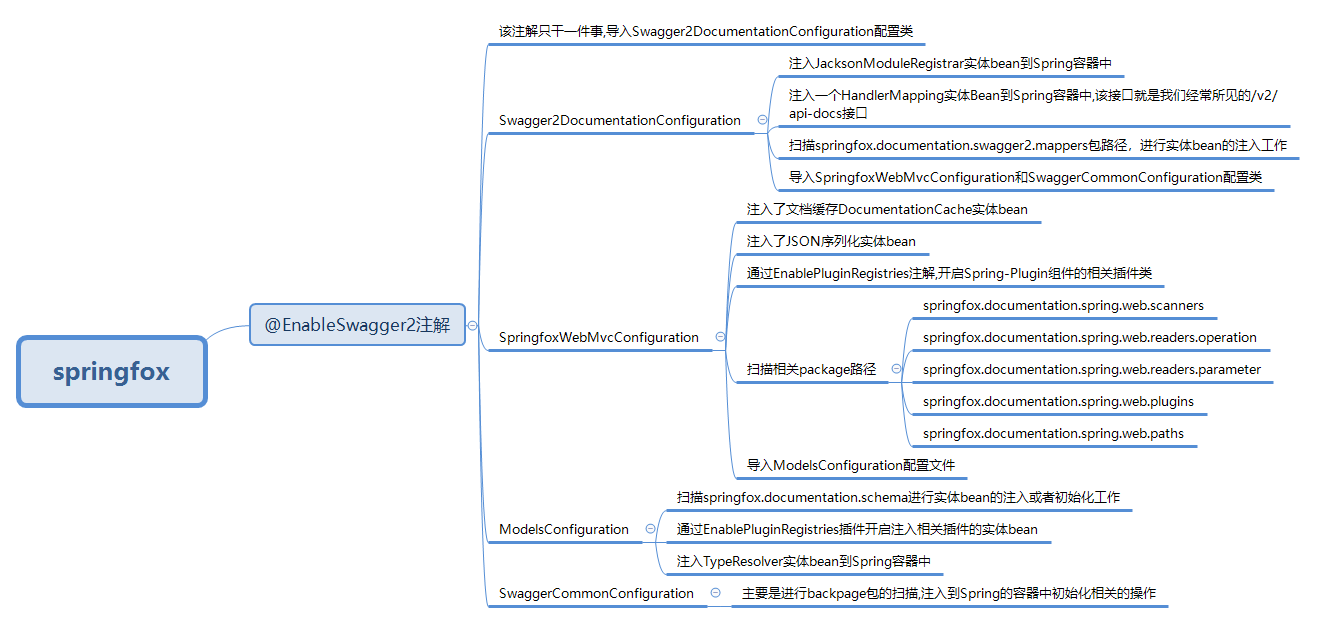
@EnableSwagger2注解只干一件事,导入Swagger2DocumentationConfiguration配置类
Swagger2DocumentationConfiguration
继续看Swagger2DocumentationConfiguration的代码
@Configuration
@Import({ SpringfoxWebMvcConfiguration.class, SwaggerCommonConfiguration.class })
@ComponentScan(basePackages = {
    "springfox.documentation.swagger2.mappers"
})
@ConditionalOnWebApplication
public class Swagger2DocumentationConfiguration {
  @Bean
  public JacksonModuleRegistrar swagger2Module() {
    return new Swagger2JacksonModule();
  }

  @Bean
  public HandlerMapping swagger2ControllerMapping(
      Environment environment,
      DocumentationCache documentationCache,
      ServiceModelToSwagger2Mapper mapper,
      JsonSerializer jsonSerializer) {
    return new PropertySourcedRequestMappingHandlerMapping(
        environment,
        new Swagger2Controller(environment, documentationCache, mapper, jsonSerializer));
  }
}
从代码中,我们可以得知:
- 注入
JacksonModuleRegistrar实体bean到Spring容器中 - 注入一个
HandlerMapping实体Bean到Spring容器中,该接口就是我们经常所见的/v2/api-docs接口 - 扫描
springfox.documentation.swagger2.mappers包路径,进行实体bean的注入工作 - 导入
SpringfoxWebMvcConfiguration和SwaggerCommonConfiguration配置类
既然知道了swagger提供接口代码所在,那么我就先来看看Swagger2Controller的风采
@Controller
@ApiIgnore
public class Swagger2Controller {

  public static final String DEFAULT_URL = "/v2/api-docs";
  private static final Logger LOGGER = LoggerFactory.getLogger(Swagger2Controller.class);
  private static final String HAL_MEDIA_TYPE = "application/hal+json";

  private final String hostNameOverride;
  private final DocumentationCache documentationCache;
  private final ServiceModelToSwagger2Mapper mapper;
  private final JsonSerializer jsonSerializer;

  @Autowired
  public Swagger2Controller(
      Environment environment,
      DocumentationCache documentationCache,
      ServiceModelToSwagger2Mapper mapper,
      JsonSerializer jsonSerializer) {

    this.hostNameOverride =
        environment.getProperty(
            "springfox.documentation.swagger.v2.host",
            "DEFAULT");
    this.documentationCache = documentationCache;
    this.mapper = mapper;
    this.jsonSerializer = jsonSerializer;
  }

  @RequestMapping(
      value = DEFAULT_URL,
      method = RequestMethod.GET,
      produces = { APPLICATION_JSON_VALUE, HAL_MEDIA_TYPE })
  @PropertySourcedMapping(
      value = "${springfox.documentation.swagger.v2.path}",
      propertyKey = "springfox.documentation.swagger.v2.path")
  @ResponseBody
  public ResponseEntity<Json> getDocumentation(
      @RequestParam(value = "group", required = false) String swaggerGroup,
      HttpServletRequest servletRequest) {

    String groupName = Optional.fromNullable(swaggerGroup).or(Docket.DEFAULT_GROUP_NAME);
    Documentation documentation = documentationCache.documentationByGroup(groupName);
    if (documentation == null) {
      LOGGER.warn("Unable to find specification for group {}", groupName);
      return new ResponseEntity<Json>(HttpStatus.NOT_FOUND);
    }
    Swagger swagger = mapper.mapDocumentation(documentation);
    UriComponents uriComponents = componentsFrom(servletRequest, swagger.getBasePath());
    swagger.basePath(Strings.isNullOrEmpty(uriComponents.getPath()) ? "/" : uriComponents.getPath());
    if (isNullOrEmpty(swagger.getHost())) {
      swagger.host(hostName(uriComponents));
    }
    return new ResponseEntity<Json>(jsonSerializer.toJson(swagger), HttpStatus.OK);
  }

  private String hostName(UriComponents uriComponents) {
    if ("DEFAULT".equals(hostNameOverride)) {
      String host = uriComponents.getHost();
      int port = uriComponents.getPort();
      if (port > -1) {
        return String.format("%s:%d", host, port);
      }
      return host;
    }
    return hostNameOverride;
  }
从接口代码中,我们得知:
- springfox为我们提供了一个默认的接口
/v2/api-docs - 同时我们也应该知道,springfox的初始化工作不在这里,springfox在应用启动时已经初始化好相应的文档对象
Documentation,而接口此处仅仅只是从缓存对象中获取而已
SpringfoxWebMvcConfiguration
通过名称,我们可能也猜到了一部分内容,这是和Spring的webmvc相关的配置类,来看具体代码:
@Configuration
@Import({ ModelsConfiguration.class })
@ComponentScan(basePackages = {
    "springfox.documentation.spring.web.scanners",
    "springfox.documentation.spring.web.readers.operation",
    "springfox.documentation.spring.web.readers.parameter",
    "springfox.documentation.spring.web.plugins",
    "springfox.documentation.spring.web.paths"
})
@EnablePluginRegistries({ DocumentationPlugin.class,
    ApiListingBuilderPlugin.class,
    OperationBuilderPlugin.class,
    ParameterBuilderPlugin.class,
    ExpandedParameterBuilderPlugin.class,
    ResourceGroupingStrategy.class,
    OperationModelsProviderPlugin.class,
    DefaultsProviderPlugin.class,
    PathDecorator.class,
    ApiListingScannerPlugin.class
})
public class SpringfoxWebMvcConfiguration {

  @Bean
  public Defaults defaults() {
    return new Defaults();
  }

  @Bean
  public DocumentationCache resourceGroupCache() {
    return new DocumentationCache();
  }

  @Bean
  public static ObjectMapperConfigurer objectMapperConfigurer() {
    return new ObjectMapperConfigurer();
  }

  @Bean
  public JsonSerializer jsonSerializer(List<JacksonModuleRegistrar> moduleRegistrars) {
    return new JsonSerializer(moduleRegistrars);
  }

  @Bean
  public DescriptionResolver descriptionResolver(Environment environment) {
    return new DescriptionResolver(environment);
  }

  @Bean
  public HandlerMethodResolver methodResolver(TypeResolver resolver) {
    return new HandlerMethodResolver(resolver);
  }

}
从代码中能知道:
- 注入了文档缓存DocumentationCache实体bean
- 注入了JSON序列化实体bean
- 通过
EnablePluginRegistries注解,开启Spring-Plugin组件的相关插件类,关于Spring-Plugin我们后面会说明 - 扫描相关package路径
- 导入
ModelsConfiguration配置文件
来看ModelsConfiguration配置类有做了那些操作呢
@Configuration
@ComponentScan(basePackages = {
    "springfox.documentation.schema"
})
@EnablePluginRegistries({
    ModelBuilderPlugin.class,
    ModelPropertyBuilderPlugin.class,
    TypeNameProviderPlugin.class,
    SyntheticModelProviderPlugin.class
})
public class ModelsConfiguration {
  @Bean
  public TypeResolver typeResolver() {
    return new TypeResolver();
  }
}
和SpringfoxWebMvcConfiguration配置类行为相似,主要是:
- 扫描
springfox.documentation.schema进行实体bean的注入或者初始化工作 - 通过
EnablePluginRegistries插件开启注入相关插件的实体bean - 注入
TypeResolver实体bean到Spring容器中
SwaggerCommonConfiguration
Swagger的公共配置类
@Configuration
@ComponentScan(basePackages = {
    "springfox.documentation.swagger.schema",
    "springfox.documentation.swagger.readers",
    "springfox.documentation.swagger.web"
})
public class SwaggerCommonConfiguration {

}
主要是进行backpage包的扫描,注入到Spring的容器中初始化相关的操作
思维导图
或许通过一张思维导图,我们能对本小结有一个初步的印象,对@EnableSwagger2注解的做作用有一个初步的了解
总结就是两点:
- 扫描package
- 注入bean
总结
整个springfox的初始化工作如果我们从上面来看,那绝对是灾难.心中肯定会有诸多疑问:
- 我们通过在外部创建Docket对象,提供诸如扫描接口包路径的方式进行文档分组,springfox何时初始化?
- 分组的接口代码在哪儿?
- 初始化的入口在哪儿?
这主要是因为Springfox使用Spring的@Component注解和ComponentScan扫描包导致的,让我们无从下手啊(累觉不爱)~~~~
带着这些疑问,我们继续往下看~~!